
Build an Azure Sentinel lab - part two: automated access provisioning
Learn how to automate access provisioning within your Azure Sentinel lab
In the first post of our Azure Sentinel lab-building series, we learned how to deploy a team lab in a fully automated manner. Using Azure Bicep, it was possible to automatically provision a lab that included a Sentinel SIEM alongside a configurable number of virtual machines. Moreover, the lab included a Sysmon-based solution allowing users to create detection analytics targeting real-life adversary behaviours. Finally, the lab could be deployed and destroyed on-demand, helping save costs.
However, access provisioning depended on manual processes. Each user had to be manually granted access to 5 resources in the Sentinel lab through a process that was repetitive and error-prone. Such a process can only be sustained with small teams or when users are not frequently rotated.
In this post, we will learn the basics of fully automating access provisioning to our Azure Sentinel lab. By expanding our Bicep scripts and employing some additional automation scripts we’ll cut out all manual steps from our deployment workflow.
Prerequisites
To successfully follow this article, you’ll need to fulfil three requirements:
- You’ll need the Azure Sentinel lab deployment code developed in the previous post.
- You’ll also need to fulfil the prerequisites outlined in the previous post, as they will help you install the necessary tools.
- Finally, ensure you have invited all users into the lab’s Azure tenant. You can follow this Azure tutorial to learn to execute bulk user invites.
Automating access provisioning
To automate access provisioning we will need to grant each user Contributor access to the below resources:
- The user’s specific virtual machine
- The public IP address assigned to the user’s virtual machine
- The network interface card (nic) assigned to the user’s specific machine
- The Microsoft Sentinel solution deployed within the lab
- The Log Analytics workspace assigned to the Sentinel solution
We can automate access provisioning with the Microsoft.Authorization/roleAssignments resource. This resource is an extension resource type, meaning that we can apply it to any other resource in our lab to assign Contributor access.
Using the roleAssignments resource is very simple:
resource RoleAssignmentName 'Microsoft.Authorization/roleAssignments@2022-04-01' = {
  scope: target_resource // Name of the target resource
  name: guid(user_principalId, 'b24988ac-6180-42a0-ab88-20f7382dd24c', target_resource.id)
  properties: {
    roleDefinitionId: resourceId('Microsoft.Authorization/roleDefinitions', 'b24988ac-6180-42a0-ab88-20f7382dd24c')
    principalId: user_principalId // Value retrieved with python script
    principalType: 'User' // Specifies the type of principal requiring access
  }
}
After declaring the resource by naming and referencing it, we configure the scope, name and properties parameters. The scope parameter allows us to define the target resources that need to be accessed by our lab users. The name property, as you may guess, is simply the string identifier that we want to assign to the individual roleAssignments resources.
To ensure we create a unique resource identifier, we can use the guid function and pass it the user principalId value, the resource ID of the Contributor role in Azure and the ID of the target resource.
We must also configure the resource’s properties parameter. In this parameter, we must indicate the user principalId via the principalId parameter and the type of principal requiring access. Unsurprisingly in our case, the principal will be of type User.
Finally, we must pass the roleDefinitionId parameter. This is done by using the resourceId function to return the unique identifier of our Contributor role resource. Within the resourceId function we pass the Microsoft.Authorization/roleDefinitionsresource name and, again, the resource ID of the Contributor role in Azure.
Extending the deployment script
Now that we understand how to automate access provisioning using Azure Bicep, we must modify our deployment script to grant each user contributor access to their assigned virtual machine, Azure Sentinel and the virtual machine’s public IP and NIC.
Before we dig deeper into updating our deployment scripts, we must modify our parameters.json file. Recall that within the parameters file we had defined the below property:
{ "workstationcount" : {
            "value": 1 // Configures number of virtual machines to deploy
        }}
This property will have to be modified as follows:
{ "userprincipalids" : {
            "value": {
                "pc1": "object ID of PC1 user",
                "pc2": "object ID of PC2 user",
            }
        }}
Within the new userprincipalids property, we define the number (and identifier) for each virtual machine and map it to the principal ID of the virtual machine’s assigned user.
Then, we must modify the main.bicep script to integrate the change made to the parameters.json file. To do this, we add the below configuration parameter at the top of the main.bicep file:
param userprincipalids object
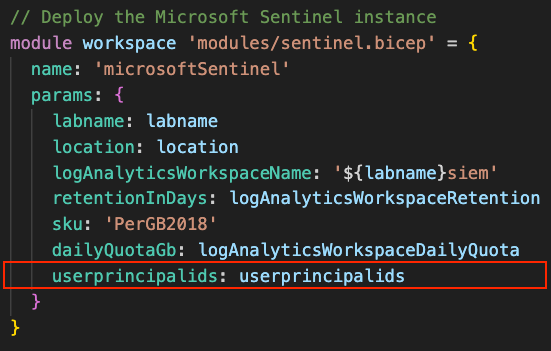
Then we must add a userprincipalids property within the Sentinel module deployment code and reference the script configuration parameter that we just created:
We must also modify the virtual machine module deployment code in two areas, as shown below:

As you can see the iteration loop is the first element to be updated. To do so we must build the iteration on the length of the userprincipalids array within the parameters.json file. This is done using the length function to return the number of elements in the userprincipalids array.
Finally, we must modify the Sentinel module deployment code by adding a principalId parameter. In this parameter, we pass the user principal ID of the associated virtual machine. We do this by combining the range value of each iteration in the loop with some clever string interpolation to derive the correct virtual machine ID value needed to index the userprincipalids array.
Automating access provisioning for the virtual machines
To ensure the changes applied on main.bicep work, we must also update the vm.bicep module. Firstly, we modify the file to receive the principalId parameter passed by the main.bicep deployment script. We do so by adding a principalId parameter at the top of the vm.bicep file:
param principalId string
Secondly, we must ensure that each lab user has access to the public IP address of the virtual machine assigned to them. This is done by inserting the following snippet under the pip resource definition code:
// Assign user the contributor role to the virtual machine's public IP address
resource PipRoleAssignment 'Microsoft.Authorization/roleAssignments@2022-04-01' = {
  scope: pip
  name: guid(principalId, 'b24988ac-6180-42a0-ab88-20f7382dd24c', pip.id)
  properties: {
    roleDefinitionId: resourceId('Microsoft.Authorization/roleDefinitions', 'b24988ac-6180-42a0-ab88-20f7382dd24c')
    principalId: principalId
    principalType: 'User'
  }
}
Note how we referenced the pip resource in the scope parameter. By doing so, we are letting the PipRoleAssignment resource know the target resource upon which the role assignment must be applied. Then, in the principalId parameter, we pass the principal ID value of the user that needs Contributor access to the public IP.
We must also add a similar code snippet to make sure users are assigned the contributor role to the network interface card of their assigned virtual machine. This is done after the definition of the nic resource, like so:
// Assign user the contributor role to the virtual machine's NIC
resource NicRoleAssignment 'Microsoft.Authorization/roleAssignments@2022-04-01' = {
  scope: nic
  name: guid(principalId, 'b24988ac-6180-42a0-ab88-20f7382dd24c', nic.id)
  properties: {
    roleDefinitionId: resourceId('Microsoft.Authorization/roleDefinitions', 'b24988ac-6180-42a0-ab88-20f7382dd24c')
    principalId: principalId
    principalType: 'User'
  }
}
Finally, we must ensure that contributor rights are assigned to the virtual machines. This is done after the definition of the workstationAssociation resource, right at the bottom of the vm.bicep file:
// Assign user the contributor role to virtual machine
resource VmRoleAssignment 'Microsoft.Authorization/roleAssignments@2022-04-01' = {
  scope: vm
  name: guid(principalId, 'b24988ac-6180-42a0-ab88-20f7382dd24c', vm.id)
  properties: {
    roleDefinitionId: resourceId('Microsoft.Authorization/roleDefinitions', 'b24988ac-6180-42a0-ab88-20f7382dd24c')
    principalId: principalId
    principalType: 'User'
  }
}
Automating access provisioning for Sentinel
The sentinel.bicep file must also be modified. However, compared to the vm.bicep file, we need to read the entire userprincipalids array into the sentinel.bicep file. This is done by defining, at the top of the file, a userprincipalids parameter of type object, like so:
param userprincipalids object
Then we must assign permissions to the log analytics workspace resource defined after the parameters. To do so, we will use the same iteration strategy employed with the virtual machine module deployment code in main.bicep.
We will iterate over all the values in the userprincipalids array, extract the user principal ID value and use it to assign permissions to the Sentinel log analytics workspace. This is done as follows:
// Assign lab users the contributor role to the Log Analytics workspace
resource WorkspaceRoleAssignment 'Microsoft.Authorization/roleAssignments@2022-04-01' = [for i in range(0, length(userprincipalids)): {
  scope: workspace
  name: guid(userprincipalids['pc${(i + 1)}'], 'b24988ac-6180-42a0-ab88-20f7382dd24c', workspace.id)
  properties: {
    roleDefinitionId: resourceId('Microsoft.Authorization/roleDefinitions', 'b24988ac-6180-42a0-ab88-20f7382dd24c')
    principalId: userprincipalids['pc${(i + 1)}']
    principalType: 'User'
  }
}]
Note how we used the length function exactly as we did in the main.bicep file to iteratively assign permissions to virtual machines. Also, notice how we used the same string interpolation to extract the correct user principal ID from the array.
Finally, we must also perform the same iteration to assign permissions to the Sentinel solution resource, like so:
// Assign lab users the contributor role to the Microsoft Sentinel solution
resource SolutionRoleAssignment 'Microsoft.Authorization/roleAssignments@2022-04-01' = [for i in range(0, length(userprincipalids)): {
  scope: solution
  name: guid(userprincipalids['pc${(i + 1)}'], 'b24988ac-6180-42a0-ab88-20f7382dd24c', solution.id)
  properties: {
    roleDefinitionId: resourceId('Microsoft.Authorization/roleDefinitions', 'b24988ac-6180-42a0-ab88-20f7382dd24c')
    principalId: userprincipalids['pc${(i + 1)}']
    principalType: 'User'
  }
}]
The code is the same as the one used in the WorkspaceRoleAssignment resource. The only difference is that the permissions are assigned to the scope of the solution resource.
Automating the retrieval of principal IDs
The provisioning of access permissions has now been fully updated within our deployment script. To use our new access provisioning automation we have to add the user IDs to the userprincipalids parameter in the parameters.json file. To do this, we must retrieve the object IDs of each user invited to the lab’s tenant.
This is done by accessing Microsoft Entra ID and navigating to the Users blade to view the full list of users invited to our lab’s tenant. The user Object ID value is found by clicking on each user profile, as shown below:
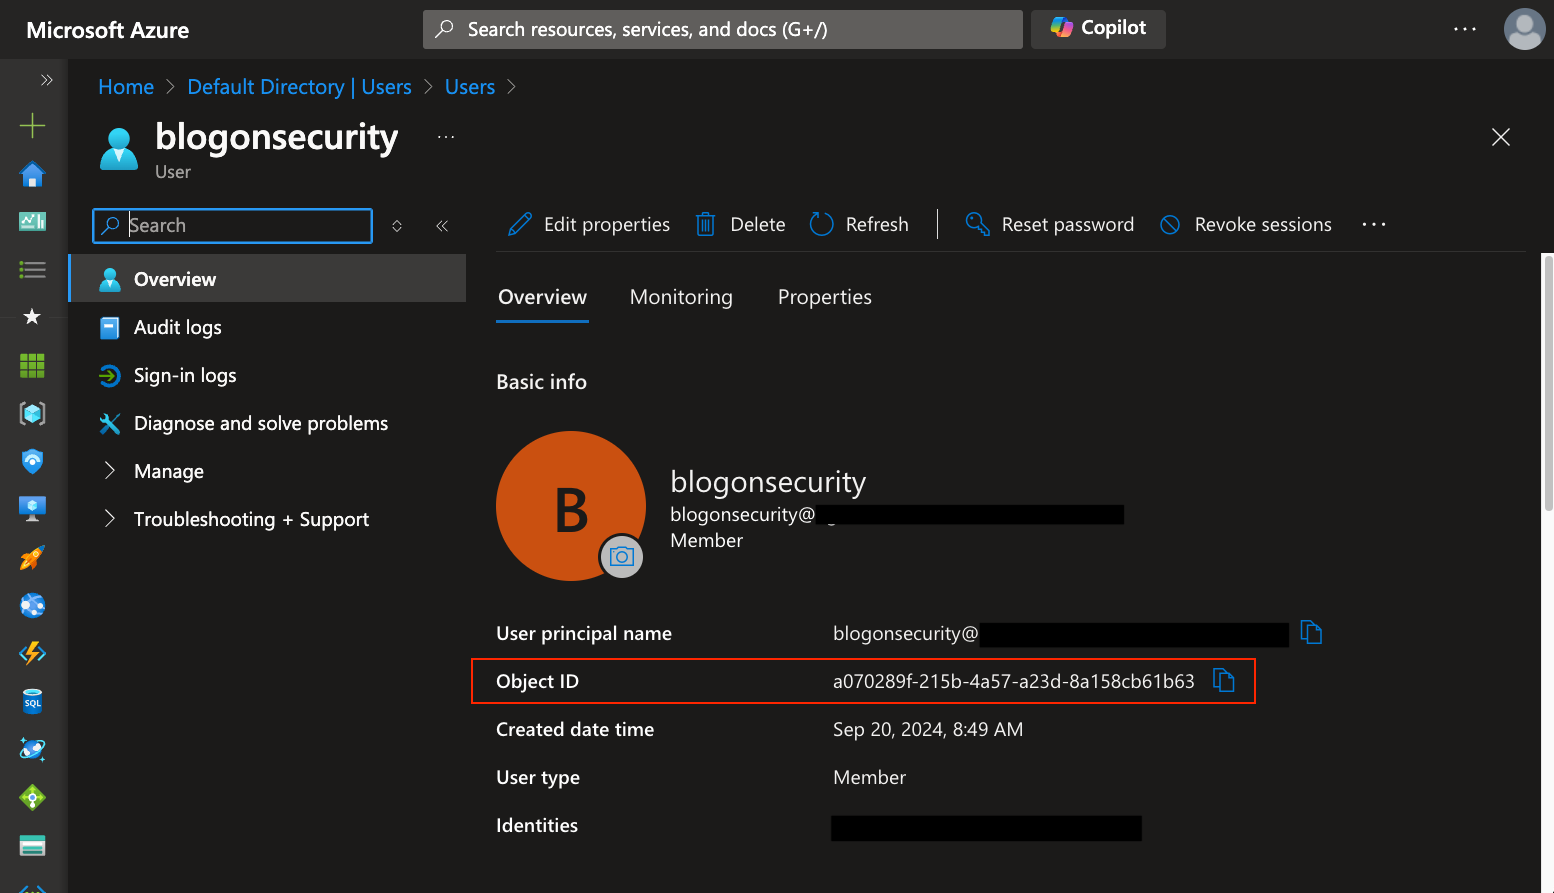
While retrieving individual user object IDs is a quick process, this becomes rapidly tedious once we start managing 10 or more users in the lab.
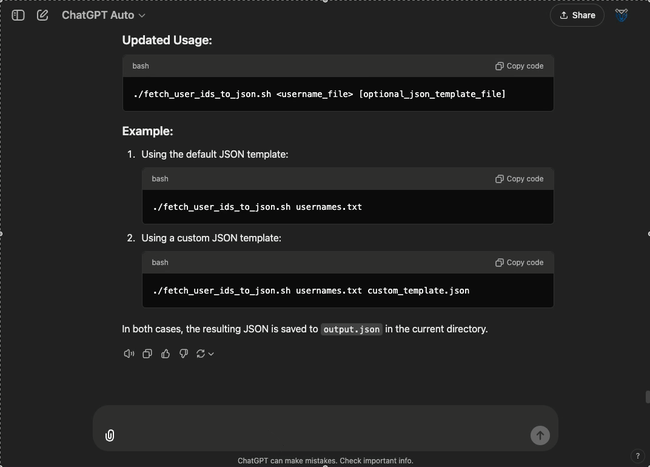
Fortunately, we can automate the retrieval of user object IDs and generate a working parameters.json file with a simple script. To build it, we’ll be using ChatGpt to write a script that iteratively runs the below command to extract the object ID for every user:
az ad user show --id USER_PRINCIPAL_NAME
Once the object IDs are extracted, we add them to our parameters.json file. To build the full script we can start with the below ChatGPT query:
Create a bash script that performs the following actions:
- Reads a text file containing a list of username strings
- For each username, run the command az ad user show --id {username}
- Read the json output and extract the "id" value
We can then progressively instruct ChatGPT to refine the script so that each user ID is added to the value JSON dictionary. Then, once the value dictionary is complete, the script should add it to the principaluserids parameter of our parameters.json file. You can find the full set of prompts to build the script here.
The result will be a script similar to the below:
#!/bin/bash

# Check if the username file is provided as an argument
if [ -z "$1" ]; then
    echo "Usage: $0 <username_file> [json_template_file]"
    exit 1
fi

# Set default JSON template if none is provided
default_json_template='{
    "$schema": "https://schema.management.azure.com/schemas/2019-04-01/deploymentParameters.json#",
    "contentVersion": "1.0.0.0",
    "parameters": {
        "location": {
            "value" : ""
        },
        "labname": {
            "value" : ""
        },
        "userprincipalids": {
            "value": {}
        },
        "vmoffer": {
            "value" : ""
        },
        "vmostag": {
            "value" : ""
        },
        "vmpublisher": {
            "value" : ""
        },
        "vmsku": {
            "value" : ""
        },
        "vmsize": {
            "value" : ""
        },
        "vmusername": {
            "value" : ""
        },
        "vmpassword": {
            "value" : ""
        },
        "configscriptlocation": {
            "value" : "https://raw.githubusercontent.com/blogonsecurity/vm-scripts/main/win10-vm-sysmon-post-deployment-config.ps1"
        },
        "logAnalyticsWorkspaceRetention": {
            "value": 30
        },
        "logAnalyticsWorkspaceDailyQuota": {
            "value": 5
        }
    }
}'

# Load the JSON template
if [ -n "$2" ]; then
    if [ -f "$2" ]; then
        json_template=$(cat "$2")
        echo "Using JSON template from file: $2"
    else
        echo "Template file $2 not found. Using default template."
        json_template="$default_json_template"
    fi
else
    json_template="$default_json_template"
    echo "No template file provided. Using default template."
fi

# Initialize the iteration counter
iteration=1

# Read the file line by line
while IFS= read -r username; do
    if [ -n "$username" ]; then
        # Run the command for each username
        echo "Fetching user info for: $username"
        user_info=$(az ad user show --id "$username" 2>/dev/null)

        if [ $? -eq 0 ]; then
            # Extract the 'id' value from the JSON output
            user_id=$(echo "$user_info" | jq -r '.id')

            if [ "$user_id" != "null" ]; then
                # Add the extracted user ID to the userprincipalids.value object with pc{iteration} as key
                json_template=$(echo "$json_template" | jq --argjson it "$iteration" --arg id "$user_id" '.parameters.userprincipalids.value += {("pc" + ($it | tostring)): $id}')
                echo "User ID for $username added as pc$iteration: $user_id"
            else
                echo "User ID not found for $username"
            fi
        else
            echo "Failed to fetch info for $username"
        fi

        # Increment the iteration counter
        iteration=$((iteration + 1))
    fi
done < "$1"

# Write the final JSON object to output.json
echo "$json_template" | jq '.' > output.json
echo "JSON output written to output.json"
If you are using a Windows operating system you can also use ChatGPT to convert the script to PowerShell:
Conclusion
With the access provisioning updates, we can now run the same commands to deploy our lab. First, we create a resource group and deployment region within which to deploy your lab:
az group create --name [INSERT YOUR RESOURCE GROUP] --location [INSERT YOUR DEPLYOMENT REGION]
Then, we run the below deployment command:
az deployment group create --resource-group [INSERT YOUR RESOURCE GROUP] --template-file main.bicep --parameters '@main.parameters.json'
Finally, to destroy the lab, we run this command:
az group delete --name [INSERT YOUR RESOURCE GROUP]
Now accesses to the right resources for each user in the lab will be automatically provisioned. All we have to do is to ensure that all the relevant lab users are either invited or added to our lab’s tenant. Our user object ID retrieval script and updated deployment script will do the rest.
However, there is still room for improvement. In the next parts of this Azure Sentinel lab series, we will cover how to:
- Deploy a domain controller
- Automatically joining virtual machines to a domain
- Building a Sysmon parser to improve detection queries
These improvements will further enhance our lab’s infrastructure and further increase the training possibilities within it.