Build an Azure Sentinel lab - part one: deployment automation basics
Azure Sentinel is a key player in the cloud SIEM space. Learn the fundamentals by deploying a cheap, yet capable, lab
Since being launched in 2019, Azure Sentinel has quickly secured a spot within the Security Information and Event Management (SIEM) space. In a market dominated by Microsoft software, its integration capabilities with the Azure Cloud platform and the Defender endpoint protection ecosystem have provided the platform with significant competitive advantages. Moreover, its ease of deployment has subverted the timelines and complexity typically associated with SIEM implementation projects.
As more businesses look to migrate or adopt Azure Sentinel, security teams must be ready to support their organisation’s ambitions - a Sentinel lab can help get your team ready before the time comes.
Prerequisites
To deploy our Azure Sentinel lab, we need to meet several prerequisites. Specifically, these prerequisites are:
- Access to an Azure subscription: you must have Owner access to an active Azure subscription to deploy and manage the lab. Your organisation should provide you with a valid Azure subscription. Alternatively, you can create a dedicated pay-as-you-go subscription by following Azure’s documentation.
- Familiarity with Azure Bicep: to understand the code snippets in this article, a general familiarity with the Bicep Infrastructure as Code (IaC) language is needed. Deep expertise is not necessary. However, if you feel that you lack basic familiarity, Azure’s Bicep quickstart will give you all the knowledge needed to follow this article.
- Install Azure command line tools: to configure and deploy your lab you will need to install Azure’s CLI tool. You can do so by following Azure’s installation guidance. Make sure you set the CLI account to point to the correct subscription. Finally, install the Bicep extension within the CLI tool.
- A working code editor: to automate the deployment of your lab, you’ll be writing Bicep code. Editing Bicep files is best done in a code editor such as Visual Studio Code or Notepad++. Make sure to have a working code editor installed on your computer.
- Team members with access to the lab: your team members will need guest access to the Azure subscription where the lab will be deployed. Typically your organisation will have configured team access to your lab’s Azure subscription. If this is not the case you will have to create user accounts for each team member. If you do not have permission to create users on the subscription, you can also invite your team members as guests on the subscription. If your team is large, you can use the bulk invite feature to speed up the invite process.
Planning the lab
For a Sentinel lab to provide extended training value to your team, it must include the following minimum characteristics:
- The lab must provide an endpoint machine for each team member
- The lab must include an instance of Azure Sentinel, collecting telemetry from each endpoint
- The Sentinel instance must allow your team to create detection analytics targeting real-life adversary behaviours
- The lab must be cheap to run, both in terms of monetary costs as well as time invested
Taking the above into consideration, the lab must include a configurable number of virtual machines, each to be allocated to a single team member. Additionally, each endpoint must be configured to send its security logs to Sentinel. In our lab, this will be done via Azure monitoring agents, which allow for targeted and granular data collection while being simple to manage and configure.
To allow the creation of detection analytics targeting real-life adversary behaviours, the lab should use a host-level tracing tool that can be configured to detect potentially malicious activity. For this purpose, we will make use of Sysmon, a Windows free driver that, once installed on a system, remains resident across reboots and records system activity to the Windows event log.
To ensure Sysmon is adequately configured to pick up realistic indicators, we will make use of a specific Sysmon configuration based on the methodology developed by Olaf Hartong. By following this approach, we will deploy a powerful Sysmon implementation that collects log data based on known adversary behaviours, as documented within the open-source MITRE ATT&CK framework.
To save both time and money, our lab will make use of Infrastructure as Code (IaC) to automate the deployment of our lab. The IaC framework that we will use will be Microsoft’s own Bicep framework.
With Microsoft providing great quickstarts, your team should get rapidly familiar with the technology and how to use it. More importantly, Bicep will allow your team to deploy a working lab in minutes with one simple command:
az deployment group create --resource-group exRG --template-file main.bicep
Finally, Bicep will allow your team to rapidly destroy the lab also with one simple command:
az group delete --name exRG
By using Bicep and its simple commands, your team will be able to deploy and destroy the lab on demand, ensuring that the environment is only used when needed and keeping cloud resource utilisation to the absolute minimum.
Building the main deployment code
Want to quickly deploy your own Sentinel lab? Subscribe to Premium to download a working copy of the code described in this article on demand, whenever you want. You'll deploy your Sentinel lab in no time!
The main code for deploying the lab will be contained in a file called main.bicep. This file will contain the main deployment steps that Azure will need to follow to create your lab. The steps to be included in the main file are:
- Deploying a virtual network for our lab
- Deploying the Azure Sentinel instance
- Creating a data collection rule for Sysmon
- Deploying the workstations for our lab To structure the project, we’ll be using modules. As Microsoft states, a module is a Bicep file (or an ARM JSON template) that is deployed from another Bicep file. With modules, you improve the readability of your Bicep files by encapsulating complex details of your deployment. You can also easily reuse modules for different deployments.
For our lab, we will be using modules to encapsulate the deployment code for both Sentinel as well as the virtual machines. Both resources require specific deployment steps that are best removed from the main deployment code and maintained in separate files.
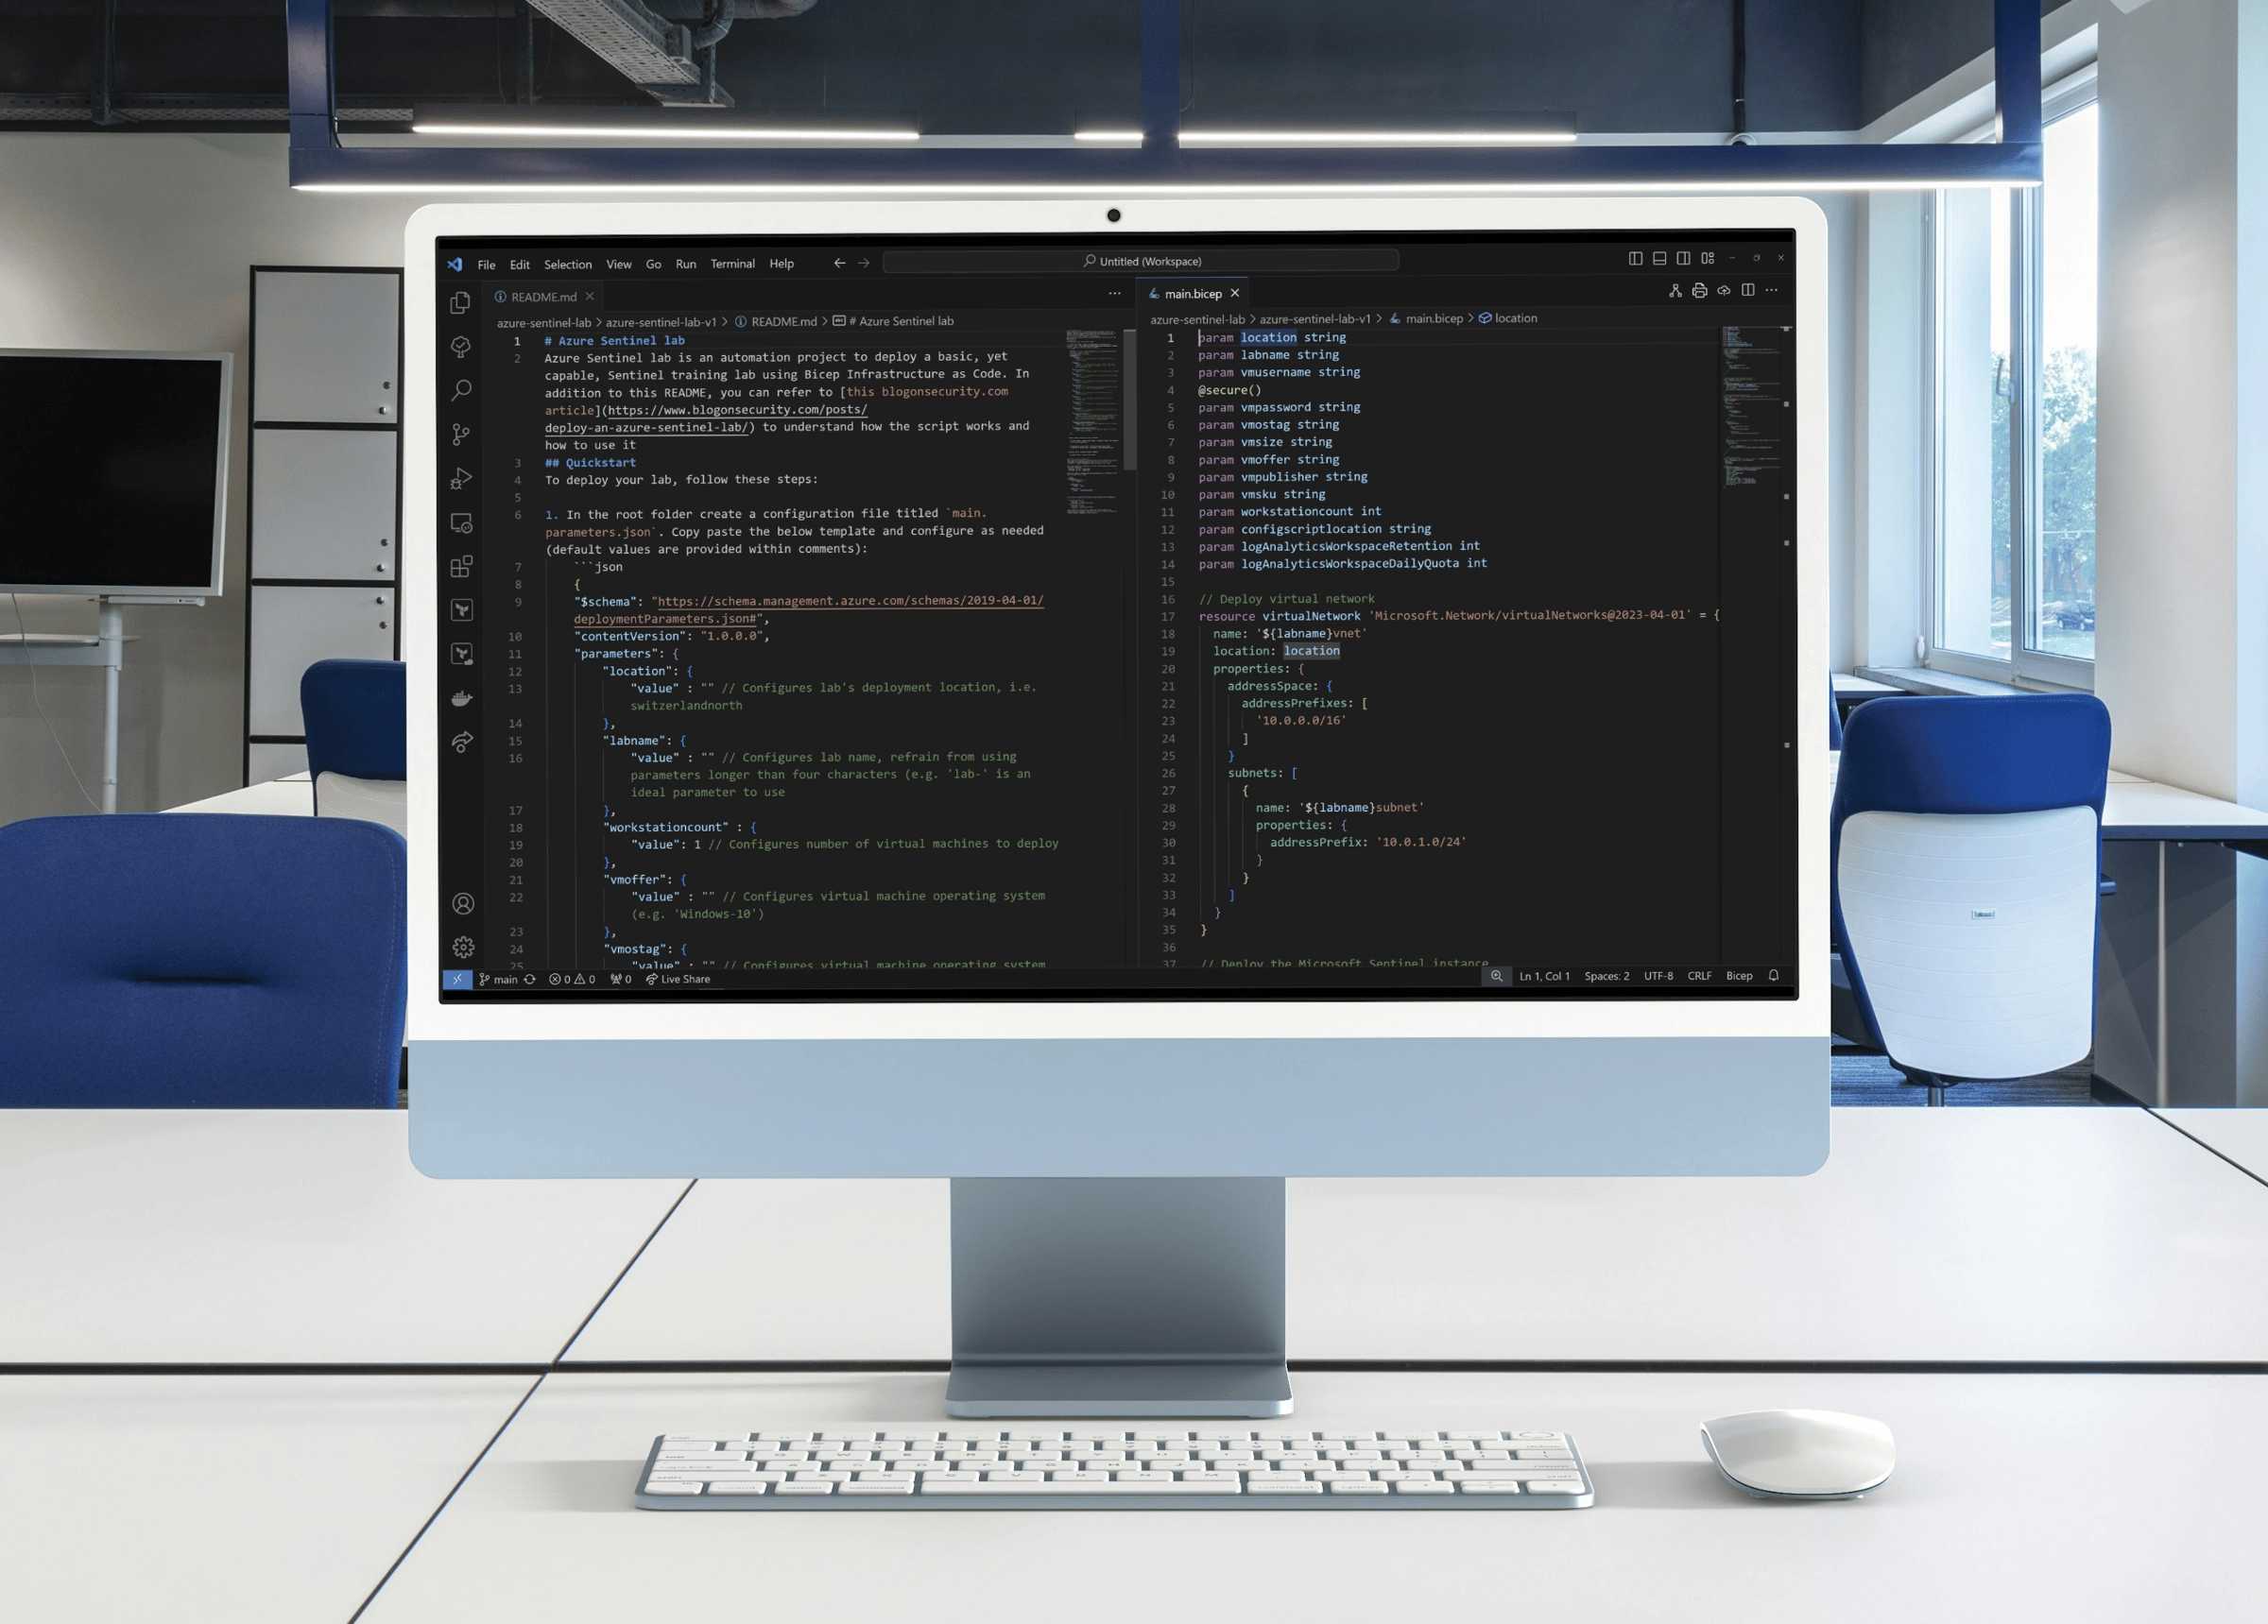
To start the creation of the main deployment code, create a folder called azure-sentinel-lab and, within it, create a file called main.bicep.
Deploying a virtual network
To deploy a virtual network we will use the Microsoft.Network/virtualNetworks resource. This resource has many parameters and values to configure. However, we’ll keep things simple and in line with Azure’s guidance. To get started we’ll define the resource name, deployment location as well as the address space and subnet properties. The resulting code is as follows:
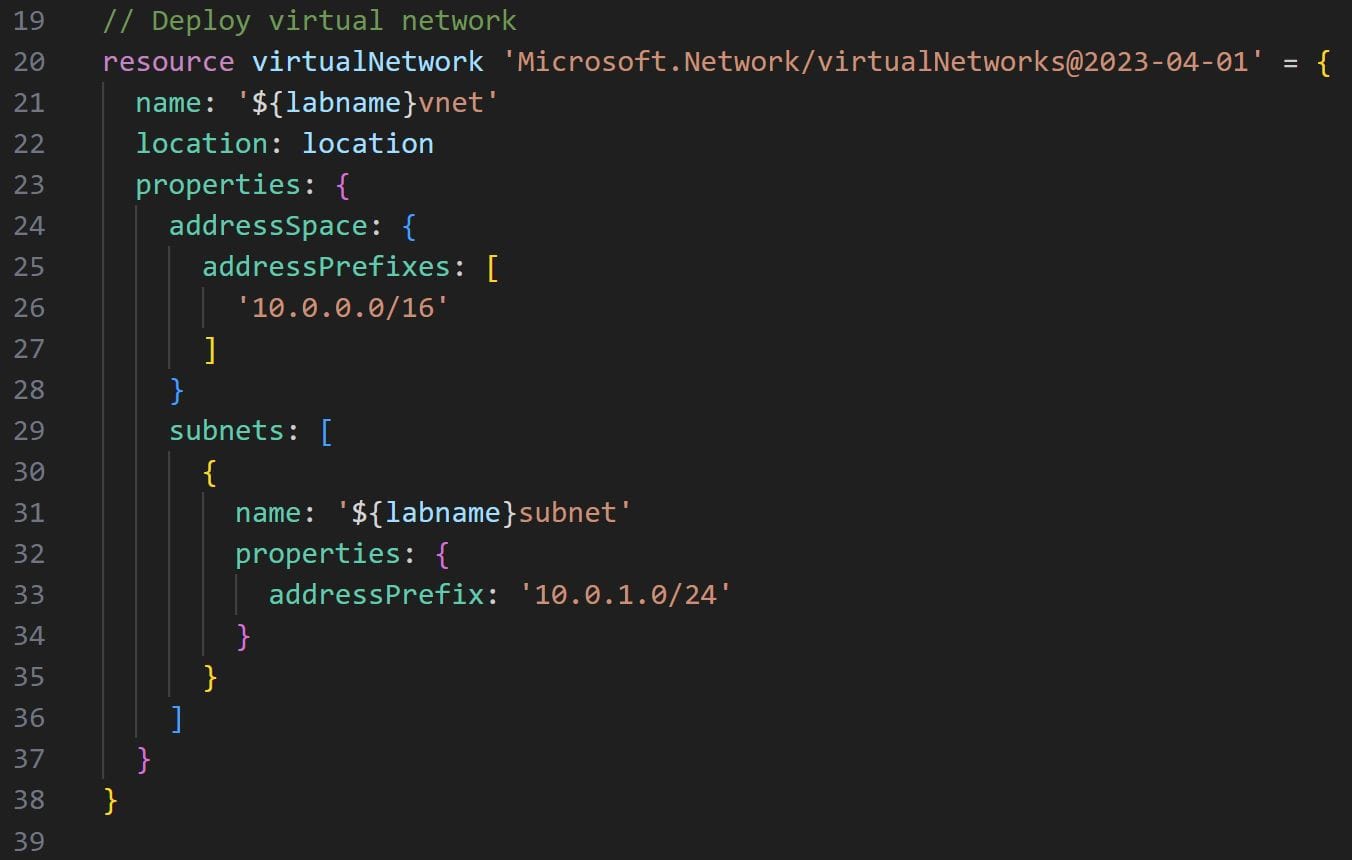
Note the name, location and subnets:name properties on like 21, 22 and 31 respectively. These are Bicep parameters that can be passed to the resource configuration code via a parameters configuration file.
Parameter files offer a convenient solution to manage frequently changeable parameters through a single configuration file. This helps us to frequently change different parameters in different parts of the deployment code. By changing one parameter through the central configuration file, the change propagates to all resources making use of the same parameter.
We’ll look later at how to build a parameters configuration file for our lab. For the moment we will simply define the two parameters needed for the resource name and location and move on. To declare a parameter in a Bicep file you simply use the param keyword, followed by the name of the parameter and the parameter type. The parameter types are based on Bicep’s data types.
For our location and lab name properties, we will use the string data type. The needed parameters are defined by adding the following two lines to the top of our main deployment file:
param location string
param labname string
Note the expression used within the name property on lines 21 and 31:
name : '${labname}vnet'
In this case, we are making use of the string interpolation expression ${expression} to reference the labname value when creating the string for the name property. By using this technique we can create a unique name for our virtual network resource based on the labname parameter. If the lab name parameter is configured to be lab- the resulting string in the name property will be lab-vnet thanks to the interpolation. We’ll be making use of string interpolation quite a lot in our deployment script.
Deploying the Azure Sentinel instance
Writing the code to deploy the lab’s Azure Sentinel instance is a more straightforward task. Using Bicep’s module feature we simply have to declare the path where our Sentinel deployment module is located within the project. To set up the module create a sub-folder called modules and create a file named sentinel.bicep. We will define the deployment code within the sentinel.bicep file later.
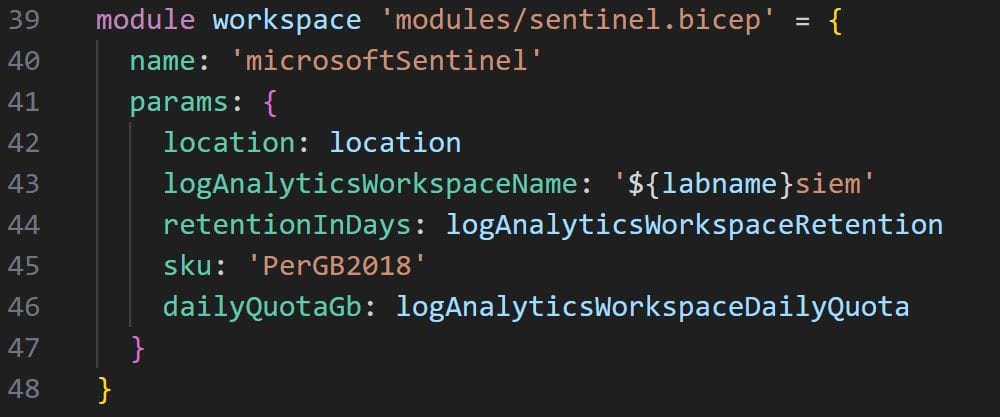
To use the module in our main.bicep file, all we have to do is use the module expression, declare the name of the resource and then add a path to our module, in this case modules/sentinel.bicep. Bicep will automatically link the Sentinel submodule to the main Bicep file and deploy the lab accordingly.
Our Sentinel Bicep module will require seven parameters for it to be correctly linked within the main Bicep deployment code. Follow the code in the below image to invoke and configure the Sentinel deployment module:
Creating a data collection rule for Sysmon
To ensure that data from the virtual machines flows to Azure Sentinel we’ll need to create a data collection rule, or DCR. Azure’s DCRs provide a convenient solution to centrally configure and manage ETL-like data collection pipelines in an Azure cloud environment.
As per Azure’s documentation, using DCRs brings the following advantages:
- Allows for the configuration of a common set of destinations for different data sources
- It gives us the ability to apply a transformation to filter or modify incoming data before it’s stored
- It provides a consistent method for configuration of different data sources
- It enables scalable configuration options supporting infrastructure as code and DevOps processes
As of 2024 azure virtual machines using Azure Monitoring Agents are among the list of data collection scenarios supported by DCRs. Thanks to our DCR rule we can ensure that, come deployment time, all lab virtual machines that have an azure monitoring agent installed will automatically forward their Sysmon log data to Sentinel.
To deploy the DCR we will use the Microsoft.Insights/dataCollectionRules resource. For this resource to work properly, the configuration of several parameters is required.
First we will start by configuring some basic parameters such as name, deployment location, DCR rule type and some deployment tags. Like so:
name: 'DCR'
location: location
kind: 'Windows'
tags: {
  createdBy: 'Sentinel'
}
Then we will configure the dataFlows, dataSources and destinations properties. The dataFlows parameter allows us to define the specific data streams that our DCR collection rule should target and the destination where these streams should be stored. The data stream that we’ll target with our DCR is the Microsoft-SecurityEventstream and we’ll pipe the data within our Sentinel’s log analytics workspace. This is all configured as follows:
dataFlows: [
     {
       destinations: [
         '${labname}siem'
       ]
       streams: [
         'Microsoft-SecurityEvent'
       ]
     }
   ]
The dataSources property allows us to configure the DCR to surgically collect only the specific data that we need from the Microsoft-SecurityEvent stream. To configure the collection of Sysmon data, Azure requires the use of queries using xPath syntax. The relevant xPath query to be used to extract Sysmon data from the Microsoft-SecurityEvent stream is Microsoft-Windows-Sysmon/Operational!*.
If you have to collect additional log data from the stream beyond Sysmon, you can do so by deriving and extracting xPath queries through the Windows Event Viewer utility. The dataSources property is then configured as follows:
dataSources: {
     windowsEventLogs: [
       {
         name: 'WindowsSecurityLogs'
         streams: [
           'Microsoft-SecurityEvent'
         ]
         xPathQueries: [
           'Microsoft-Windows-Sysmon/Operational!*'
           ]
       }
     ]
   }
Finally, to configure the destinations parameter we simply have to specify the Sentinel log analytics workspace as a destination. This is done by using the logAnalytics parameter and providing the log analytics workspace name and its resource ID. This is done as follows:
destinations: {
     logAnalytics: [
       {
         name: '${labname}siem'
         workspaceResourceId: workspace.outputs.workspaceResourceId
       }
     ]
   }
The code for the data collection rule ultimately all comes together as follows:

Deploying the workstations for our lab
We will again use Bicep’s module feature to deploy the lab virtual machines. To set up the module create a file named vm.bicep in the modules sub-folder. As before, we will define the deployment code within the vm.bicep file later in the article.
Compared to the Sentinel module we will have to create several virtual machines equal to the number of members in our team. To do so we first define a workstationcount parameter, of type integer, at the top of the main.bicep file, like so:
param workstationcount int
Then, thanks to the range function, we will use an iterative loop to create as many virtual machines as specified in the workstationcount parameter. If we set the workstation count value to 10, then the loop will create 10 virtual machines in our lab. The Bicep syntax to create an iteration loop to deploy multiple resources is as follows:
module workstations 'modules/vm.bicep' = [for i in range(0, workstationcount): {
  name: // virtual machine name
  dependsOn: [
    workspace
  ]
  params: {
    // parameters
  }
}
Note the dependsOn parameter in the code above, this parameter is very important as it tells Bicep to initiate the deployment of the virtual machines only after the Sentinel instance has been deployed. Finally, the virtual machine Bicep module will require fourteen parameters. The code in the image below shows how to configure the vm module within the main file:
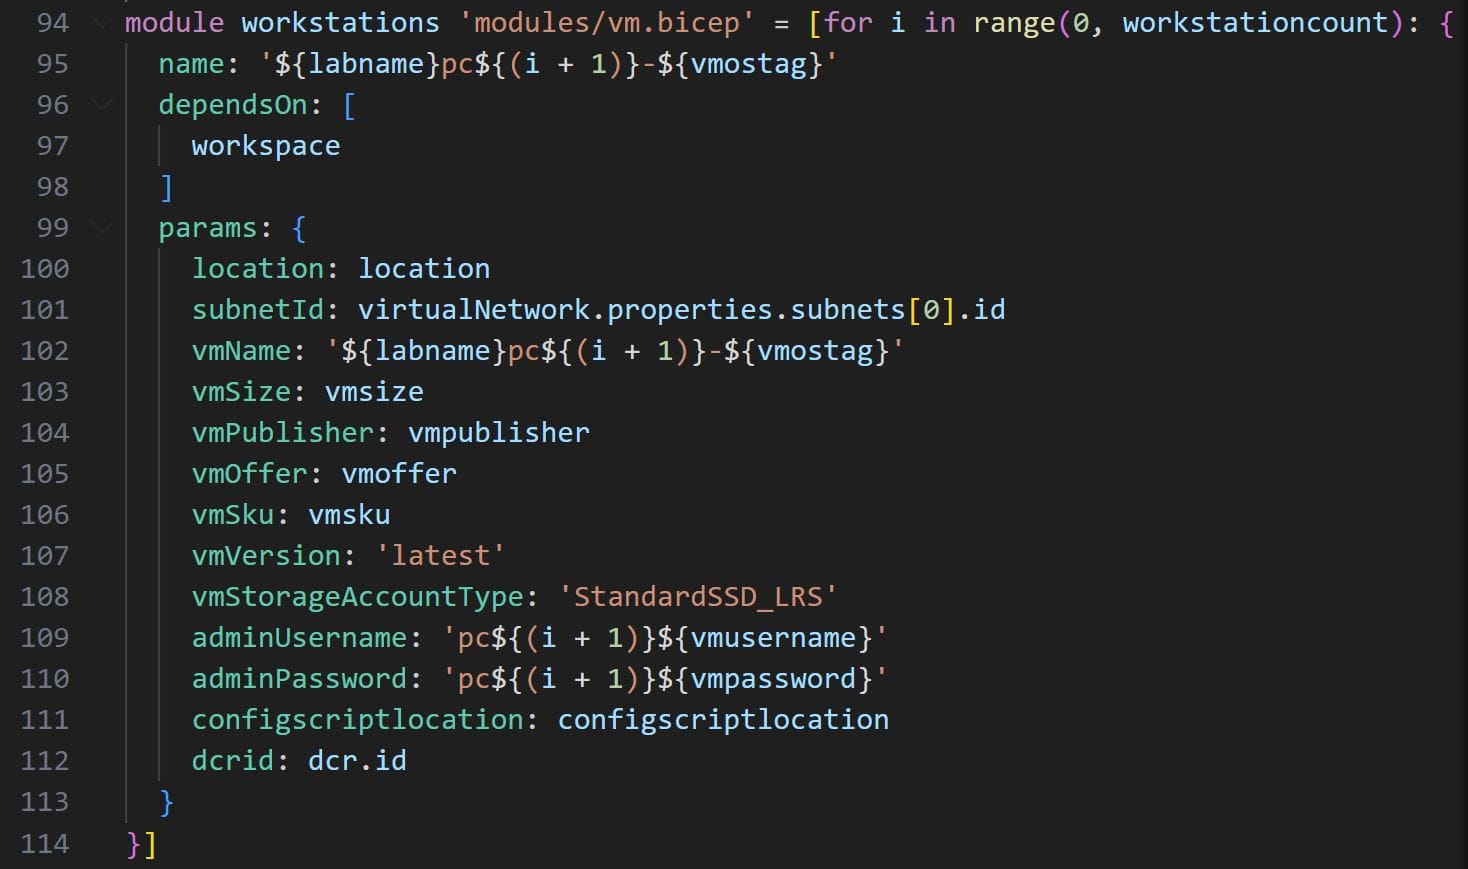
Notice also the dcrid parameter defined on line 117. This parameter is also important as it passes the identifier for the DCR rule we created earlier to the vm module. Thanks to this parameter we will be able to connect the VM’s Azure Monitor Agent to the Sysmon data collection rule defined earlier. We will cover this in more detail in the next section.
To complete the creation of our main deployment script, copy-paste the remaining parameter values at the top of the file:
param vmusername string
@secure()
param vmpassword string
param vmostag string
param vmsize string
param vmoffer string
param vmpublisher string
param vmsku string
param workstationcount int
param configscriptlocation string
param logAnalyticsWorkspaceRetention int
param logAnalyticsWorkspaceDailyQuota int
Note the @secure() decorator on top of the adminPassword parameter. Decorators allow us to specify metadata for our lab parameters (such as documentation descriptions for the parameters themselves), or constraints. The secure decorator is an example of a constraining decorator as it marks the parameter as secure. This prevents it from being saved or logged within Azure’s deployment history.
Building the virtual machine module
The vm.bicep module will define in a single, convenient file all of the deployment automation steps applied to each virtual machine in our lab. The creation of virtual machines requires the following steps:
- Creating the network resources
- Configuring and deploying the virtual machine
- Configuring Sysmon log collection
In total, we’ll be requiring six resources to achieve the steps above. But before adding the deployment code we must specify 14 configuration parameters. These parameters will capture the parameters passed to the module via the main.bicep file. At the top of the vm.bicep file, add the below configuration parameters:
param location string
param subnetId string
param vmName string
param vmSize string
param vmPublisher string
param vmOffer string
param vmSku string
param vmVersion string
param vmStorageAccountType string
param adminUsername string
@secure()
param adminPassword string
param configscriptlocation string
param dcrid string
Creating the network resources
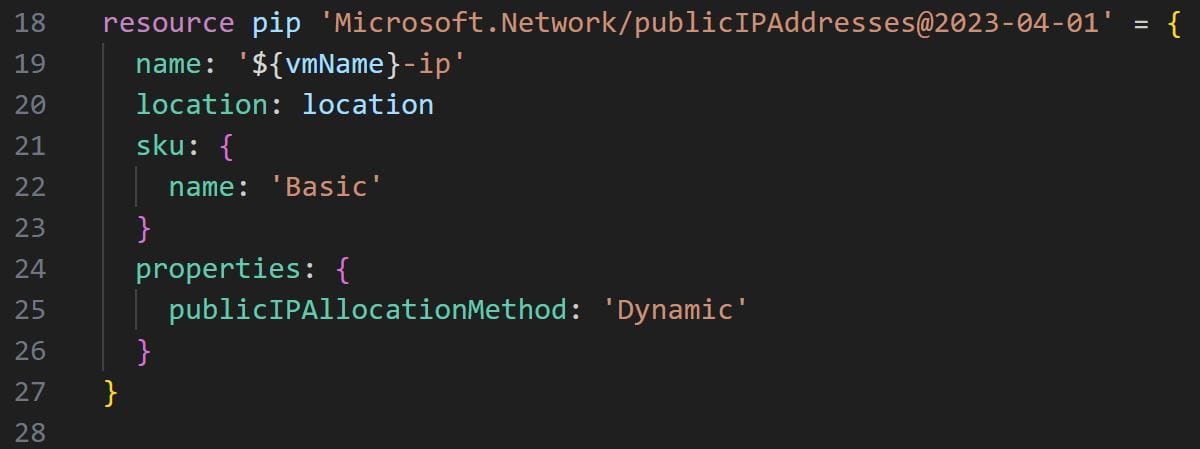
To deploy the VM network resources we will use the Microsoft.Network/publicIPAddresses and Microsoft.Network/networkInterfaces resources. The first address will create the public IP address for each virtual machine. This will allow your team members to remotely connect to their virtual machine via Remote Desk Protocol. The second resource will create the Network Interface Cards (NICs) for each virtual machine and associate them with their public IP addresses.
For the public IP address resource, it is sufficient to specify the name, location, sku(see here for documentation on Azure SKUs) and the public IP allocation property. The resulting code is as follows:
For the virtual machine NICs we’ll need to supply an IP configuration via the ipConfigurations parameter. After specifying name and location, we will add the ipConfigurations parameters under properties, in line with the below image:
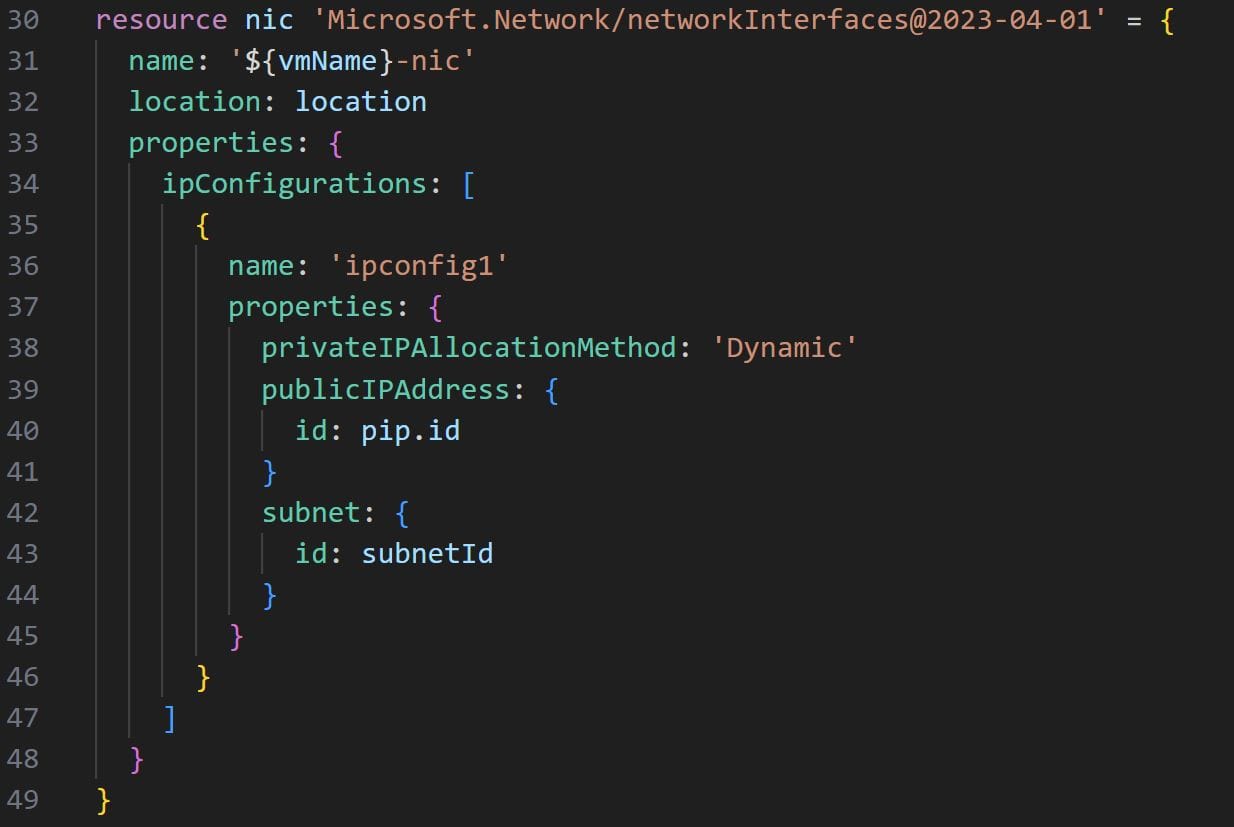
Note the publicIPAddress and subnet:id parameters. The first will have to be supplied with the id of the public IP address resource that we created before. The second will read the subnetId parameter that is passed via the main.bicep file.
Configuring and deploying the virtual machine
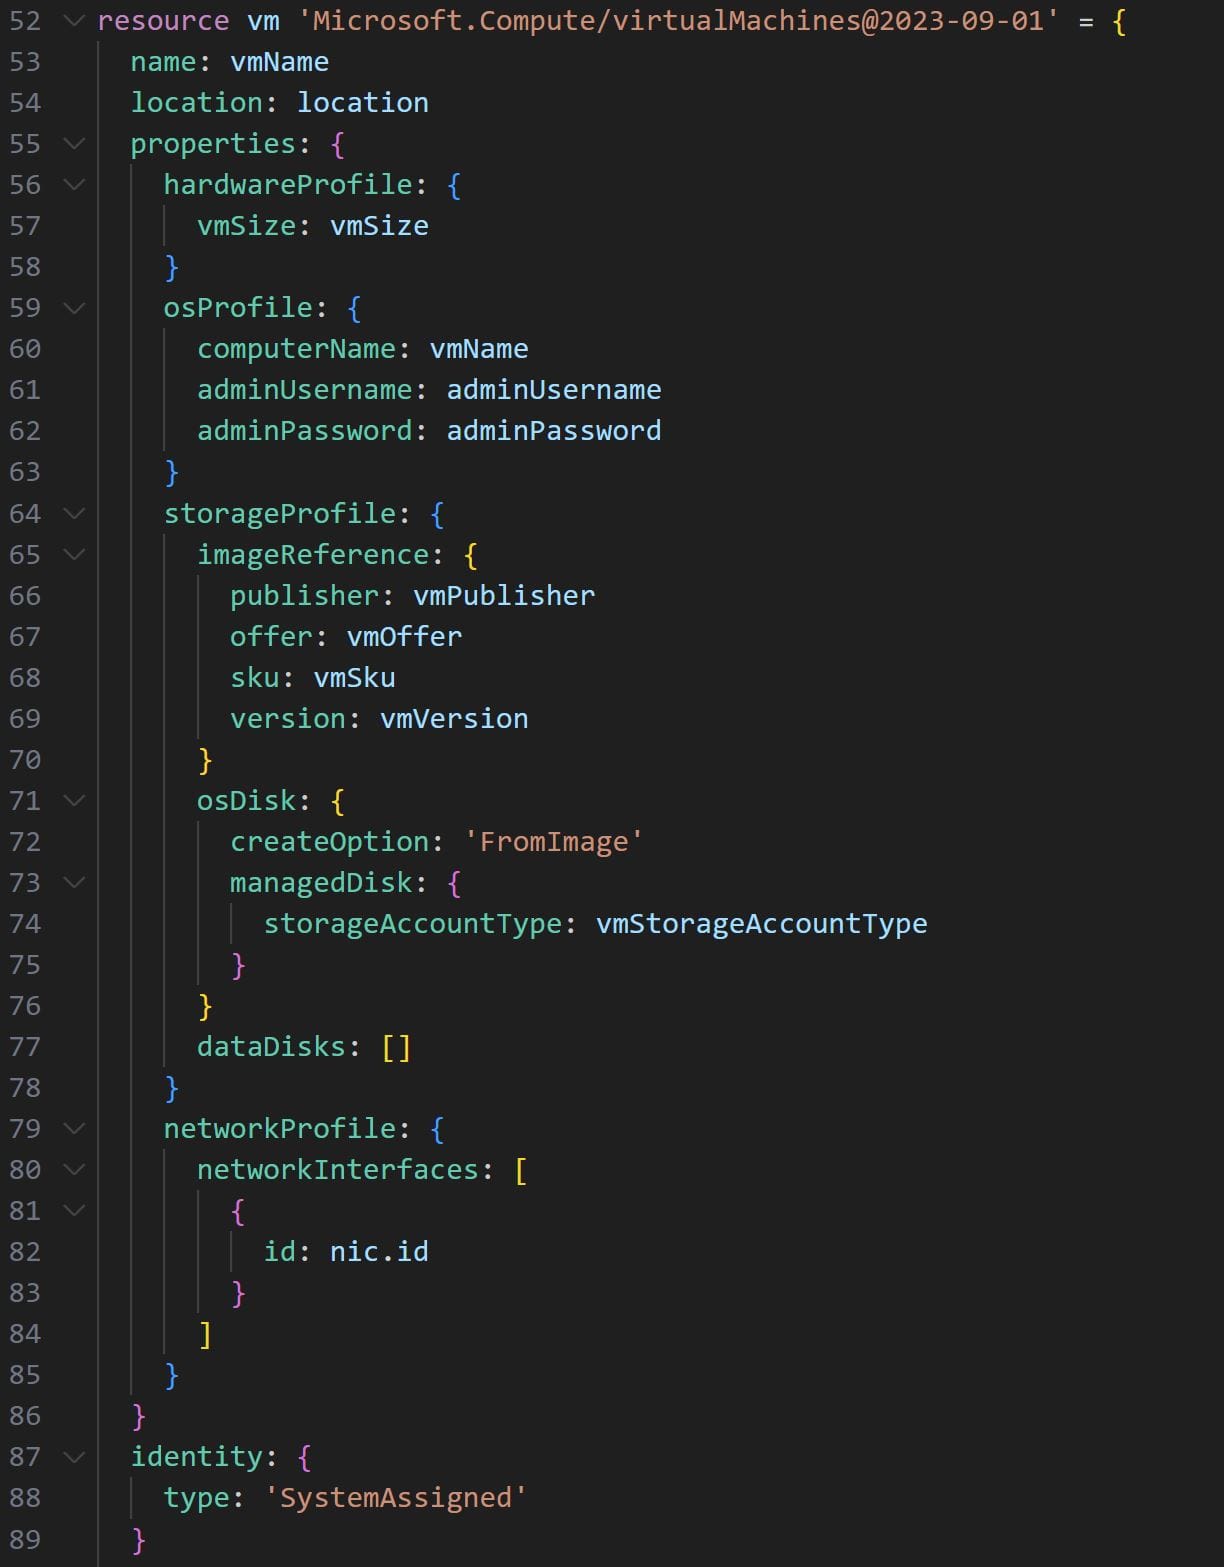
To deploy the virtual machine we’ll use the Microsoft.compute/virtualMachines resource. Several properties need to be configured for the resource to be deployed:
- The
hardwareProfilewhere we will specify the hardware settings for the virtual machine via thevmSizeparameter - The
osProfilewhere we’ll specify the operating system settings used while creating the virtual machine, such as the username and password - The
storageProfile, used to specify the storage settings for the virtual machine disks via theimageReferenceandosDiskparameters - The
networkProfilewhere we’ll configure the network interface of the virtual machine using the ID of the NIC resource we created earlier
Note that all of the configurations for the virtual machine code will be supplied via the main.bicep file via the parameters specified at the top of the vm.bicep module code (as discussed above). The code for the virtual machine resource will be as follows:
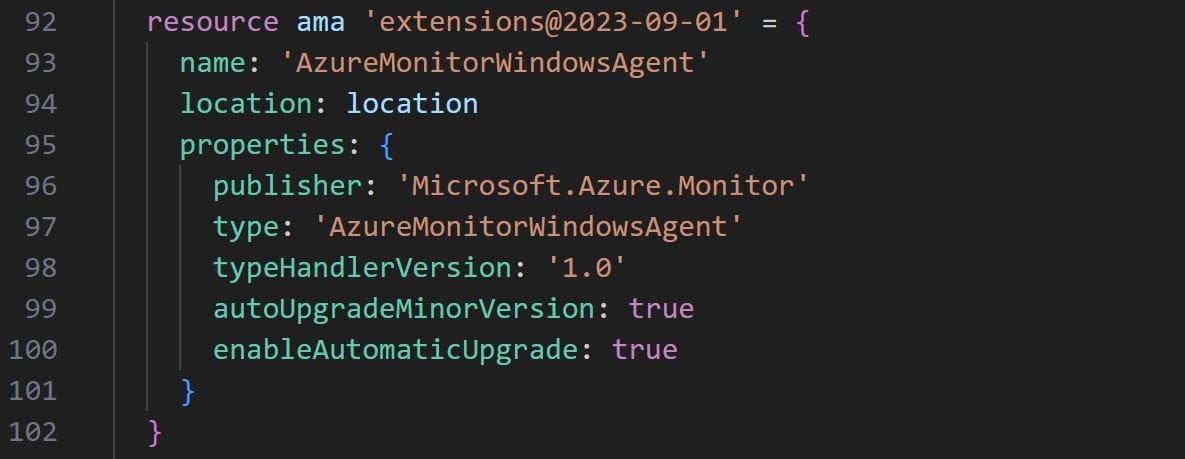
After deploying the virtual machine, we must perform two post-deployment configuration steps. Specifically, we must first install the Azure Monitoring Agent. Secondly, we must run a post-deployment configuration script to install and configure the Sysmon driver within the virtual machine.
To achieve the above steps we’ll use two extensions within our virtual machine deployment code. The first extension will install the Azure Monitoring Agent, this is achieved by adding the below code within the virtual machine resource declaration:
To complete the post-deployment configuration we’ll use a second extension to read a GitHub-hosted, public PowerShell file and execute the configuration instructions contained within. The file will contain PowerShell commands to download, configure and install the Sysmon driver on the virtual machine running it.
To do so we can make use of the protectedSettings parameter and the underlying commandToExecute property. The extension will automatically download the configuration file from GitHub and run it on the virtual machine, completing the post-deployment configuration. The final snippet of code to add within the virtual machine resource declaration will be as follows:
resource vme 'extensions@2023-09-01' = {
    name: 'PostDeploymentConfig'
    location: location
    properties: {
      publisher: 'Microsoft.Compute'
      type: 'CustomScriptExtension'
      typeHandlerVersion: '1.10'
      autoUpgradeMinorVersion: true
      protectedSettings: {
        fileUris: [
          '${configscriptlocation}'
        ]
        commandToExecute: 'powershell -ExecutionPolicy Unrestricted -File win10-vm-sysmon-post-deployment-config.ps1'
      }
    }
  }
Configuring Sysmon log collection
To wrap up our Bicep virtual machine deployment module we’ll use a Microsoft.Insights/dataCollectionRuleAssociations resource to connect the vm’s Azure Monitor Agent to the Sysmon data collection rule we defined in main.bicep.
All we need to do to complete the association is to specify the DCR rule ID within the dataCollectionRuleId parameter. Note that the DCR rule ID is passed to our module via the dcrid parameter specified at the top of our module’s file. The final snippet of code to type within our vm.bicep module is as follows:
resource workstationAssociation 'Microsoft.Insights/dataCollectionRuleAssociations@2022-06-01' = {
  name: '${vmName}-pcra'
  scope: vm
  properties: {
    dataCollectionRuleId: dcrid
  }
}
Building the Sentinel module
In the sentinel.bicep module we’ll define all of the steps required to deploy an Azure Sentinel instance within our lab. Deploying Sentinel via Azure Bicep requires three steps:
- Deploying a log analytics workspace to store the logs
- Deploying Sentinel
- Onboarding Sentinel to the log analytics workspace
Three resources are required to achieve these steps. Similarly to the vm.bicep module we must specify some configuration parameters that will need to be passed via the main.bicep file. At the top of the vm.bicep file, add the below configuration parameters:
param location string
param logAnalyticsWorkspaceName string
param retentionInDays int
param sku string
param dailyQuotaGb int
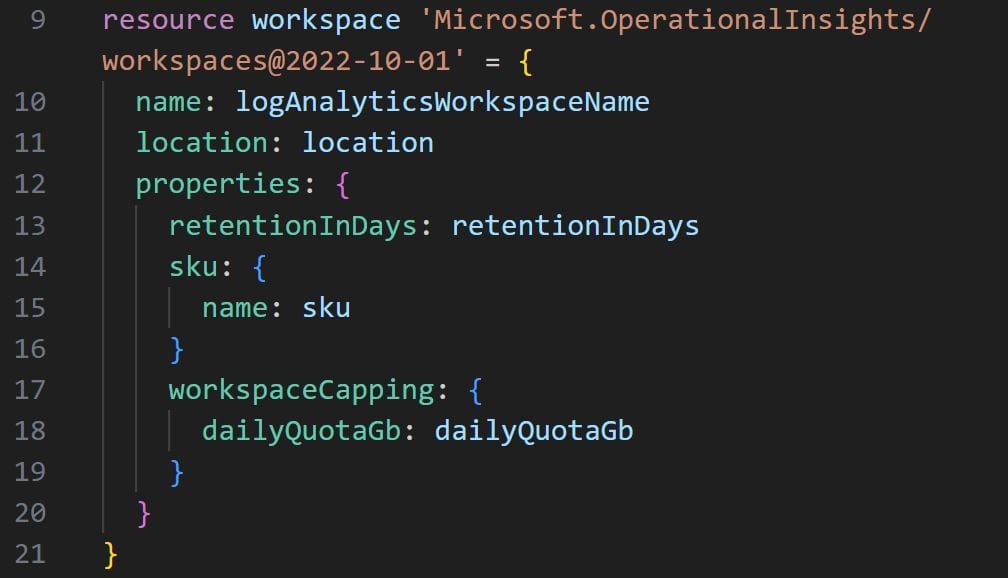
To deploy the log analytics workspace we’ll use the Microsoft.OperationalInsights/workspaces resource. For the resource to be deployed, we need to specify the name and location parameters. Finally, in the properties parameter we must specify the retentionInDays, sku and dailyQuotaGb properties, as shown in the below code:
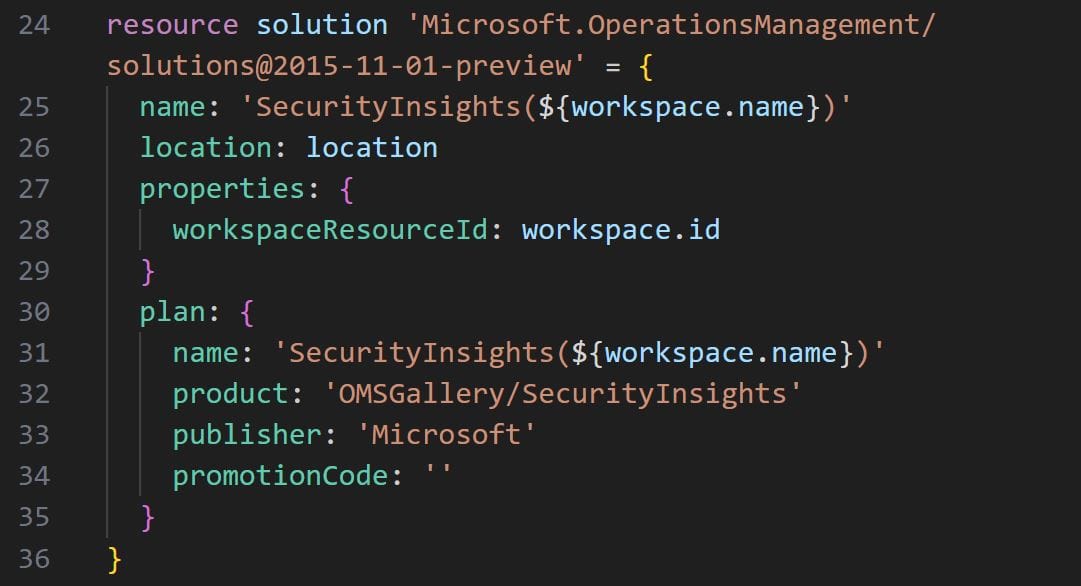
Secondly, we’ll use the Microsoft.OperationsManagement/solutions to deploy Sentinel. This resource also requires the name, location and properties parameters to be specified. Within properties, we’ll need to pass the ID of the workspace resource we created above in order to properly associate Sentinel to the correct log analytics workspace. Finally, under the plan parameter, we pass the name, product, publisher and promotionCode properties, as shown below:
Thirdly, we’ll use the Microsoft.SecurityInsights/onboardingStates to onboard Sentinel to our freshly deployed log analytics workspace, using the below code:
resource onboardingStates 'Microsoft.SecurityInsights/onboardingStates@2022-12-01-preview' = {
  scope: workspace
  name: 'default'
}
To complete our sentinel.bicep module we’ll need to output the ID of the workspace resource, so that it may be used by the main.bicep file when configuring the DCR.
We do so with the following line of code:
output workspaceResourceId string = workspace.id
Building the configuration file
To centrally manage all the configuration parameters that we created for our deployment scripts we’ll make use of a Bicep config file. Without it, we would have to manually pass all 14 parameters to the az command line tool when deploying the lab.
To create the configuration file, create a file titled main.parameters.json within the project folder. Finally, copy and paste the below config:
{
    "$schema": "https://schema.management.azure.com/schemas/2019-04-01/deploymentParameters.json#",
    "contentVersion": "1.0.0.0",
    "parameters": {
        "location": {
            "value" : ""
        },
        "labname": {
            "value" : ""
        },
        "workstationcount" : {
            "value": 1
        },
        "vmoffer": {
            "value" : ""
        },
        "vmostag": {
            "value" : ""
        },
        "vmpublisher": {
            "value" : ""
        },
        "vmsku": {
            "value" : ""
        },
        "vmsize": {
            "value" : ""
        },
        "vmusername": {
            "value" : ""
        },
        "vmpassword": {
            "value" : ""
        },
        "configscriptlocation": {
            "value" : "https://raw.githubusercontent.com/blogonsecurity/vm-scripts/main/win10-vm-sysmon-post-deployment-config.ps1"
        },
        "logAnalyticsWorkspaceRetention": {
            "value": 30
        },
        "logAnalyticsWorkspaceDailyQuota": {
            "value": 5
        }
    }
  }
Configure all the parameters as you see fit. Note that the labname parameter should be ideally no more than 4 characters long. To figure out the ideal values for the vmoffer, vmostag, vmpublisher and vmsku you can run the below command in the az command line tool:
az vm image list --all --output table
Note that the command may take a long time to execute and will generate a large output. If you know the exact type of operating system that you’d like to use for your virtual machines (i.e. Windows 10), you can specify it in the offer parameter like so:
az vm image list --offer windows10 --all --output table
This query will generally run faster and help you retrieve all the necessary parameters to configure your virtual machines. To retrieve the list of virtual machine SKUs available in the Azure deployment region that you have selected run the following command:
az vm image list-skus -l [INSERT YOUR DEPLYOMENT REGION] -f Windows-10 -p MicrosoftWindowsDesktop -o table
Deploying the lab
After completing the configuration file, your Azure Sentinel lab is now ready to deploy. Run the below command to create a resource group and deployment region within which to deploy your lab:
az group create --name [INSERT YOUR RESOURCE GROUP] --location [INSERT YOUR DEPLYOMENT REGION]
Finally, run the below command and let Bicep do its magic!
az deployment group create --resource-group [INSERT YOUR RESOURCE GROUP] --template-file main.bicep --parameters '@main.parameters.json'
Once the deployment is complete, you should be able to view all the deployed resources within your resource group, as shown in the image below:
Note that for your team members to use the lab, they must receive the necessary permissions to access their virtual machine and the Sentinel instance. This is done by granting every team member Contributor access to the below resources:
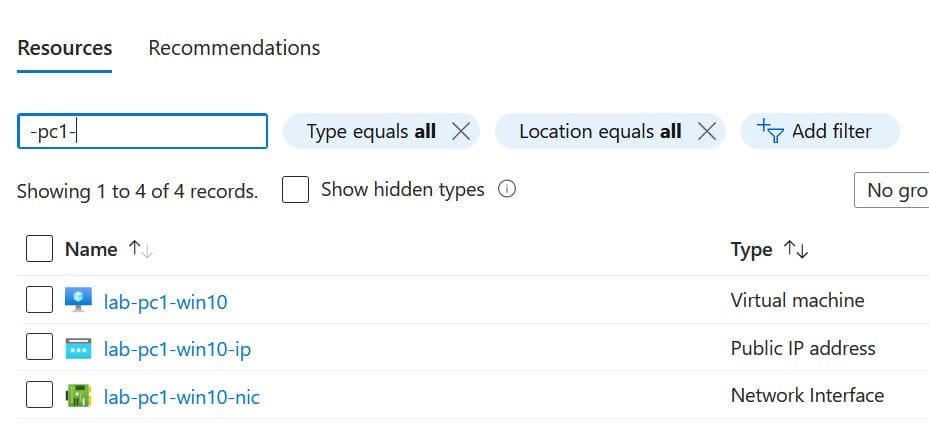
- [labname]-[vm id]
- [labname]-[vm id]-ip
- [labname]-[virtual network interface id]-nic
- [labname]-siem
- SecurityInsights([labname]-siem)
Assuming the labname was configured as lab, the virtual machine resources to be assigned to teammate 1 will be as illustrated in the below image:
Granting Contributor access to the relevant team member resources is easily done through the Azure portal as described within this tutorial.
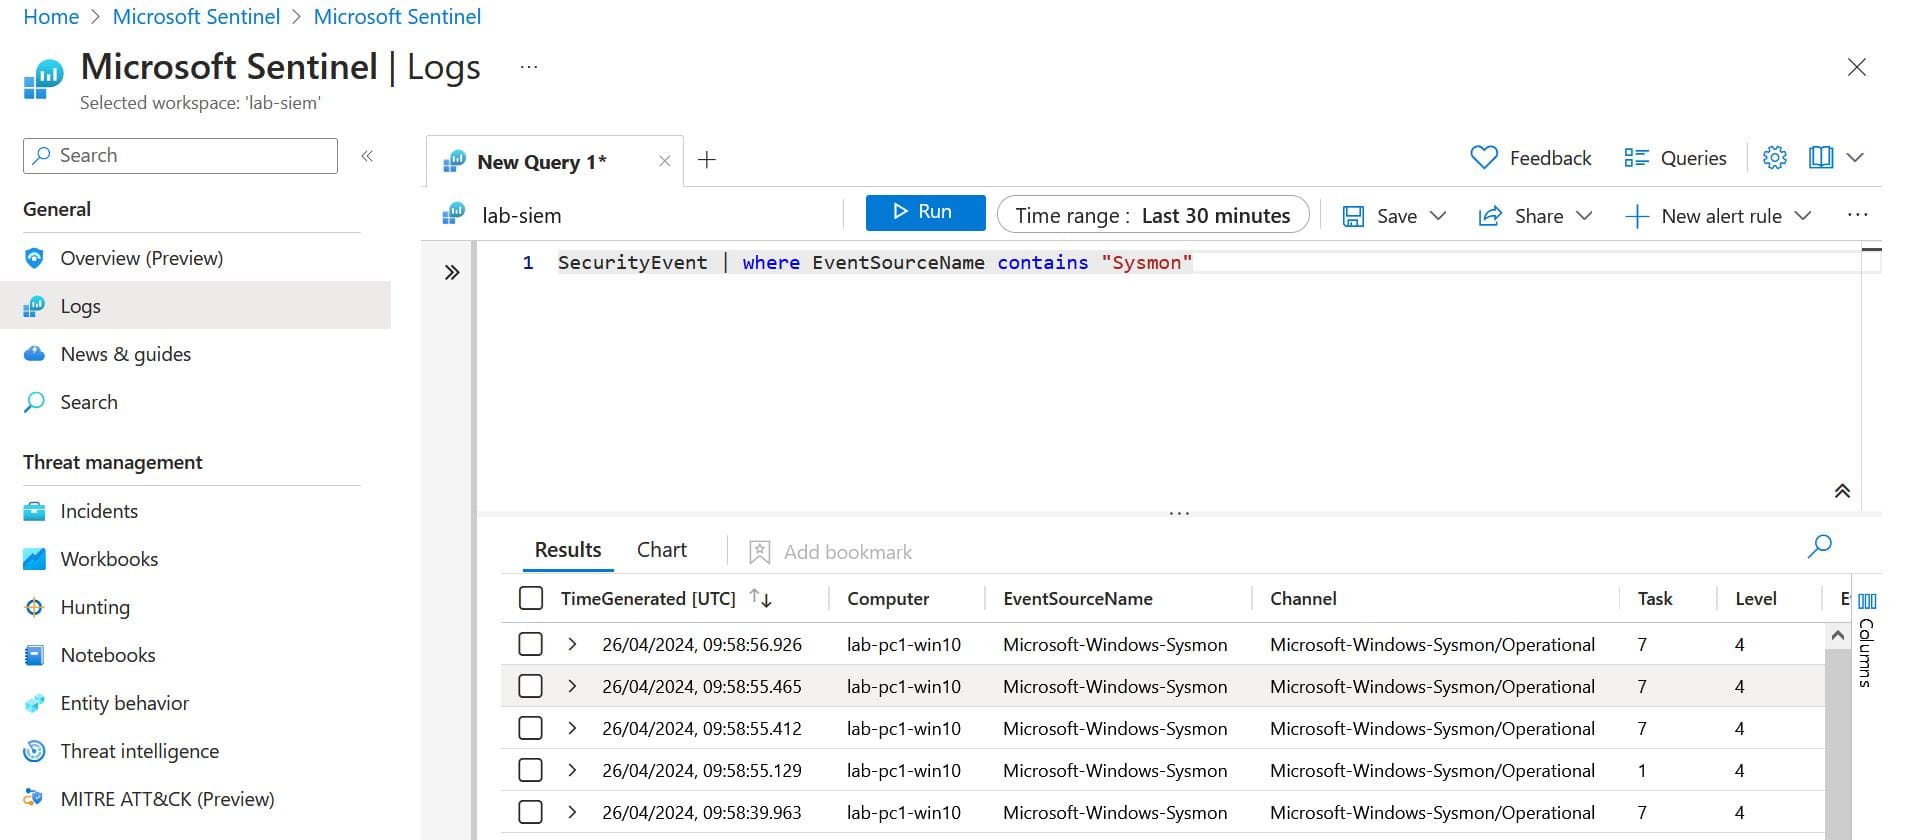
Finally, to test that Sysmon data is correctly being sent to Sentinel, open the Azure Sentinel resource via the Azure portal and type the below query in the logs blade:
SecurityEvent | where EventSourceName contains "Sysmon"
If all works, the following output should be displayed within the logs blade:
Conclusion
By following the steps in this article, you and your team will be able to automatically deploy an Azure Sentinel lab with minimal effort. More importantly, you’ll be able to deploy and destroy the lab on demand, using it only when needed.
While the Bicep script will fully automate the deployment of the lab, it could be further improved to reduce the overhead of having to manually add team member permissions via the Azure portal.
In the next parts of this Azure Sentinel lab series we will cover:
- Provisioning resource access permissions automatically
- Deploying a domain controller
- Building a Sysmon parser to improve detection queries
These improvements will fully eliminate all manual steps from the deployment workflow and provide your team with increased training capabilities.


