Running rapid risk assessments using Google Gemini and Confluence
Need to run a risk assessment for a project or tool? Learn how Gemini and Confluence can help you do it faster

If you work in cybersecurity governance, risk and compliance (GRC), chances are you’ve been asked to run rapid risk assessments. The story is often the same: you are going about your day when suddenly a manager asks you to run a security risk assessment for a new tool or project. Unsurprisingly, deadlines are often tight as everything stops while stakeholders wait for security approval. When this happens, how can we deliver risk assessment as fast as possible?
In companies with high maturity GRC practices, security specialists can leverage ready-made tools and processes to assess the underlying security risk of new tools and projects. While this factor alone won’t guarantee a quick assessment, at least there will be established procedures (and timelines) to fall back to.
Smaller security teams, instead, often have to improvise. Typically they can only rely on general risk management policies for guidance. If dedicated risk assessment tooling is missing, it’s up to them to build it.
Fortunately, AI powered chatbots can be used precisely for this kind of situation. When circumstances demand the rapid formulation of security policies or assessments, they can act as a helpful accelerator to get things done. While chatbot-built tools cannot (yet) replace industry-leading risk assessment tools and frameworks, they can accelerate the creation of basic, yet functioning, stopgap solutions. In this article, we’ll be taking Google Gemini for a spin to see how effective it is in building a quick and dirty risk assessment tool.
Essential risk assessment components
Running a quick risk assessment that works for most situations requires a number of components:
- An understanding of the context, objective and scope of the risk assessment
- A list of risk categories and underlying factors that apply to your assessment scope
- A risk analysis of each risk factor covering both the likelihood of the risk materialising and the likely impact of the risk on the company
- A methodology to assign an overall rating to each identified risk
- Mitigation strategies to employ against each risk
- A system to assign risks to owners and make them responsible for implementing the relevant mitigation strategy
- A system to derive an overall risk assessment rating from each identified risk captured during the assessment
The first step in building our risk assessment tool is to head over to the Google Gemini website and ask the ChatBot the following question:
Create a risk assessment spreadsheet to evaluate cloud password management software
The prompt above will instruct Google Gemini to output a basic, yet functioning, risk assessment table that you can copy paste in your preferred spreadsheet software.
You can adapt the prompt to the specific scope that your assessment needs to target. Simply change the italic text in the above prompt to focus Gemini’s answer on the needed scope. For example, the prompt can be modified to assess risks involved in opening an office in a foreign country. In this case, the prompt can be adapted as follows:
Create a risk assessment spreadsheet to evaluate a project to open an office in a foreign country
For each prompt, Gemini will include a table with a starting list of risks tailored to your assessment scope. Additionally, it will include some instructions to help you complete the risk assessment table as well as some general tips to assist in evaluating the included risks.
More importantly, the assessment table will contain the right basic components needed to run such assessments. Specifically, it will include a starting list of risk factors and a working assessment methodology allowing you to evaluate individual risks by likelihood and impact.
However, the initial output will be rather basic. For example, although the table will provide an initial set of risk factors, this list won’t be comprehensive and might (or might not) contain associated mitigation strategies. Further queries will be required to identify additional risk categories and to build a more fulsome list of risks.
Identifying additional risks categories
Additional queries are needed to expand the original list of risk categories and factors produced by Gemini. Google’s AI chatbot cannot, for now, generate comprehensive lists of risks comparable to those generated by formal risk management frameworks such as NIST SP 800-53, MITRE TARA or COBIT.
However, we can use some of the general principles of formal risk management frameworks to help us expand the original list of risks. By knowing the different categories of risk captured by such frameworks, we can craft more targeted queries.
For example, the FAIR framework groups enterprise risks across five categories: compliance risks, operational risks, reputational risks, strategic risks and, finally, transactional risks. The OCTAVE framework, conversely, groups risks across three primary dimensions: threat, vulnerability and operational risks.
Using these frameworks, we can pick the risk categories that are most relevant to the scope of our assessment. For example, if we are trying to identify additional risks that could affect cloud password managers, we could build a wider list of risks taking into account, say, vulnerability, operational and compliance risk categories. Obviously such categories are not exhaustive. However, you can expand or contract your chosen categories as you or your team see fit.
Based on the selected risk categories, we can ask Gemini to provide us with a more fulsome list of risks. For example, With the query we can ask Gemini to provide a more detailed list of security vulnerabilities to consider as part of our risk assessment:
Provide a table list of key security vulnerabilities and related mitigation strategies that could affect cloud password management software
The above query will output a more comprehensive list of risks (and related mitigation strategies) belonging to the vulnerabilities risk category. This additional list can then be integrated within our risk assessment table.
Additionally, the query can be modified to list risks belonging to additional categories, as seen below:
Provide a table list of key compliance risks and related mitigation strategies that could affect cloud password management software
Defining risk rating criteria
After defining a comprehensive list of risks and mitigations, you should define your risk rating criteria. These criteria will help you assess the likelihood of an event occurring (from improbable to probable) and the impact (from acceptable to intolerable) of the issue if the event does occur. The combination of these two factors will help compute the risk rating that applies to the individual risks. Additionally, the sum of all ratings for each risk will help you derive an overall risk rating that applies to the assessment.
Defining individual risk rating criteria
Matrix tables are the best way to define risk rating criteria. On the X axis you evaluate the likelihood of the risk materialising. On the Y axis you rate the impact of the risk on the organisation, should the risk ever materialise. Finally, the centre of the matrix allows you to calculate the overall risk rating to apply to individual risks. The picture below demonstrates a good example of a risk rating matrix:
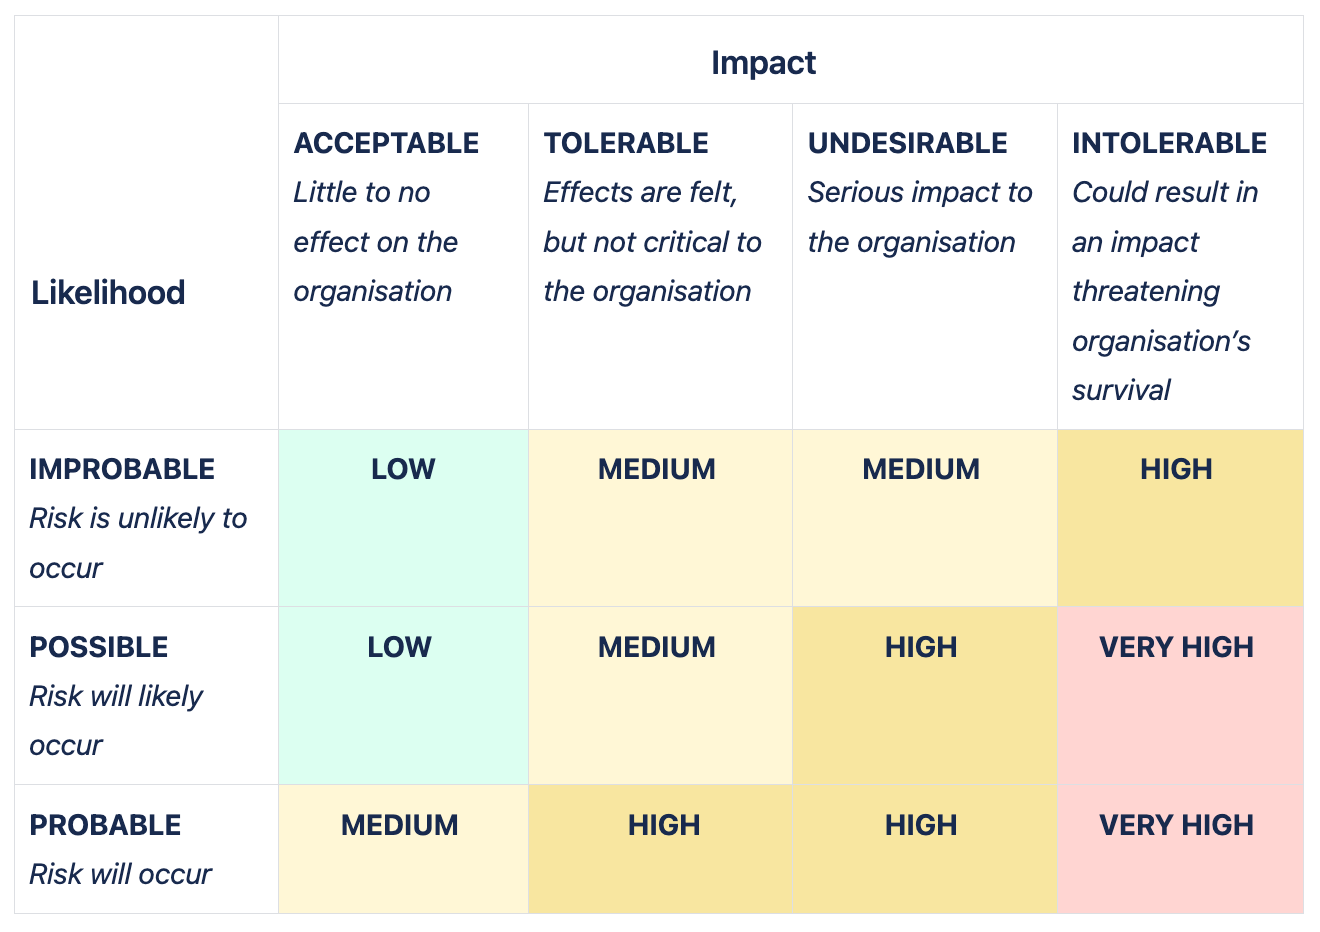
If required, you can adjust the number of ratings on the X and Y axis as required by your organisation (for example, if your organisation uses different likelihood rating criteria). If needed, you can also adjust the distribution of overall risk ratings at the centre of the matrix.
Additionally, Gemini can help with making the different rating criteria more quantifiable. This should help you and your team with assigning more precise ratings that are substantiated by measurable evidence. For example, the below query helps generate a list of quantifiable data points to consider when rating individual risks:
What are quantifiable factors that should be considered when assessing the likelihood (starting from improbable, to possible and finally probable) of a security risk materialising
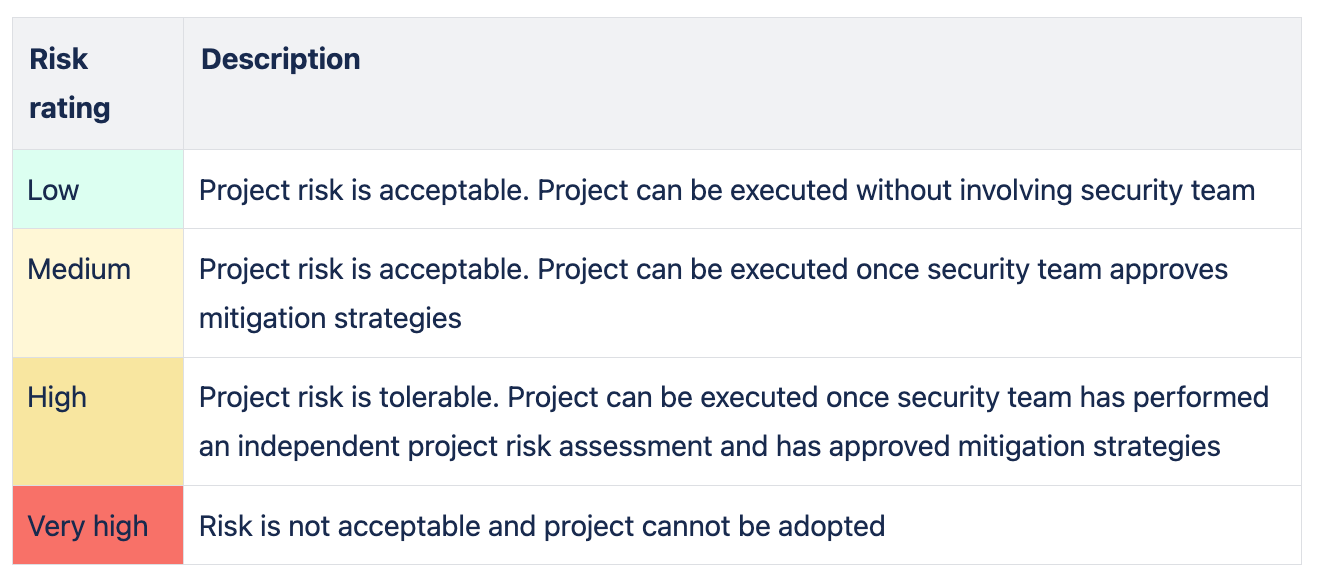
You can also use Gemini to provide a table of definitions for each computed risk rating that is derived after assessing likelihood and impact. For example, the below query will generate a table of definitions for each risk rating level:
Provide a table containing definitions for low, medium, high and very high risk ratings to be used in a security risk assessment
The definitions provided by the above query will be basic, yet fully functional. If necessary, you can also adapt them to your organisation’s rating requirements.
Calculating the overall risk rating
Calculating the overall risk rating is much easier. There are several ways to derive an overall risk level based on the ratings assigned to the individual risks. The simplest is to assign a number to each risk based on the assigned rating level (for example, 1 for low, 2 for medium, 3 for high and so on).
You then sum all values and calculate the resulting average number. The average will indicate the overall risk level to assign to your assessment. You can then provide a definition for the assessment’s overall risk rating levels, as seen in the below picture:
Such definitions can then be used to determine whether the overall level of risk is acceptable to the organisation. If the level of risk is not acceptable then the evaluated project should be stopped. Conversely, if the level is acceptable then the project can continue in line with the recommended mitigation strategies derived during the assessment.
As usual, you can fine tune the definitions and associated security requirements to suit your organisation’s needs.
Running risk assessments on Confluence
To capture the results of your risk assessments you can use any wiki software or word program. However, if your company uses Confluence, you can take advantage of the risk management template by Stiltsoft.
The template will offer a good structure out of the box. It is especially useful if you are in a rush and need to rapidly document your assessment. If we prefer, we can also create custom templates to better suit our expanded list of risks. Using Confluence ensures that the end result is quite neat, as shown in the below video:
To create the above template simply follow the below steps:
- Create a new Confluence page by clicking on the blue Create button at the top of the page
- Insert a two column layout by using the layout button found in the top editing ribbon
- In the left column add the title Project background and overall risk rating. In the same column insert this paragraph: Insert project description and the goals behind the risk assessment. For example, some possible goals could be as follows:. Complete the paragraph by adding the below bullet points:
- Identify and capture risk factors affecting INSERT PROJECT NAME
- Rate risk factors affecting INSERT PROJECT NAME
- Based on the risk factors, derive an overall risk rating for INSERT PROJECT NAME
- Identify risk mitigation strategies and (if needed) translate them into action items (to be captured as Jira tickets)
- In the right column, add this paragraph: Overall risk rating for INSERT PROJECT NAME is:. Then, just below, add an info panel containing this text: ADD OVERALL RISK RATING (LOW, MEDIUM, HIGH, VERY HIGH)
- After the two column layouts add this title: Overview of identified risks and mitigation strategies. Make sure to use a one column layout
- Below the title, add a table containing these columns: Risk ID, Risk Description, Likelihood, Impact, Risk Rating, Mitigation Strategies, Owner, Ticket
- Add to the table your risk assessment list, making sure to provide risk descriptions and mitigation strategies
- At the bottom of the risk assessment table, add this title: Risk ratings. Then add this paragraph immediately below: Used to derive the risk level of individual risks. Risk ratings are derived based on the likelihood of an event occurring (from improbable to probable) and the impact (from acceptable to intolerable) of the issue if the event does occur. The below tables document the risk rating matrix used to evaluate the overall ratings of identified risks as well as the description of each individual risk ratings:. Finally, add another two column layout immediately below
- In the right column add this title: Risk rating matrix. Immediately below, add your risk rating matrix. If you need a reference matrix table, use the one provided in the Stiltsoft template or check out the screenshots above for inspiration
- In the left column add this title: Risk ratings description. Immediately below add a table to describe your risk ratings. Again, if you need inspiration, check out the screenshots above.
To use the template, fill in the project background column and risk assessment table in line with your evaluation. Use the risk rating matrix to derive an overall risk rating for each risk, as shown in the below GIF:
To complete your risk assessment, don’t forget to calculate the overall risk rating by taking the median result from all risk ratings contained in the assessment table.
Takeaway
The combination of Google Gemini and Confluence provides a powerful accelerator to run rapid risk assessments when time and circumstances demand it.
Obviously, the workflow described in this article will never replace a detailed assessment built in line with the requirements of mature risk assessment frameworks. In fact, if your organisation seeks to run an enterprise risk assessment project then you should definitely not rely on Google Gemini and Confluence to carry out such large scale assessments.
However, for smaller use cases, AI chatbots can drastically accelerate the definition and execution of smaller risk assessment frameworks. In the hands of experienced (and even inexperienced) risk assessors, Gemini and Confluence combined will generate a solid framework to produce cogent, substantiated and actionable risk assessments.